Scene Starting
Selecting a Project and Launching the Software
Along with the project resources, configuration files for the software should be downloaded. These are usually located at:
{your_folder}/projects/<project_code>/.config
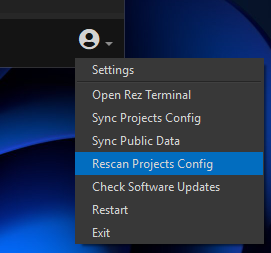
- If you’ve downloaded the files, but no available projects appear in the
Appstab, select the optionRescan Projects Config.

- Once project icons appear, you can double-click the icon to enter the project. Studio Desktop will remember the selected project for future launches. You will then see a list of available programs.

- In the
Appstab, theMayaicon will initially be greyed out and inactive.
You need to specify where Maya is installed on your computer. There are two
ways to do this:
- Right-click the
Mayaicon and selectScan for Software. Studio Desktop will try to locate Maya in its standard installation path. If unsuccessful, try the second method.
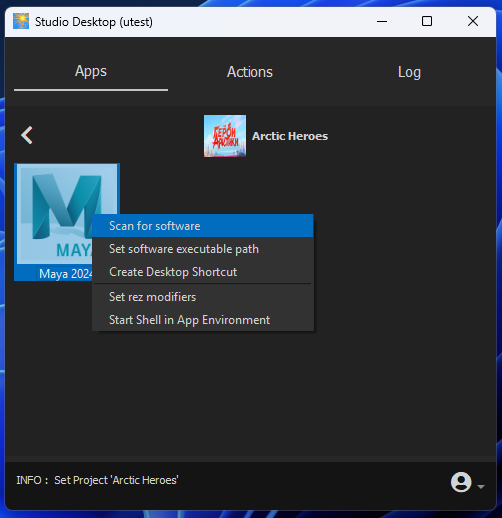
- Right-click the
Mayaicon and chooseSet Software Executable Path, then manually provide the path tomaya.exein the dialog box.

- Once you’ve set the Maya path, the icon will become colorful, and you’ll be able to launch Maya from Studio Desktop.
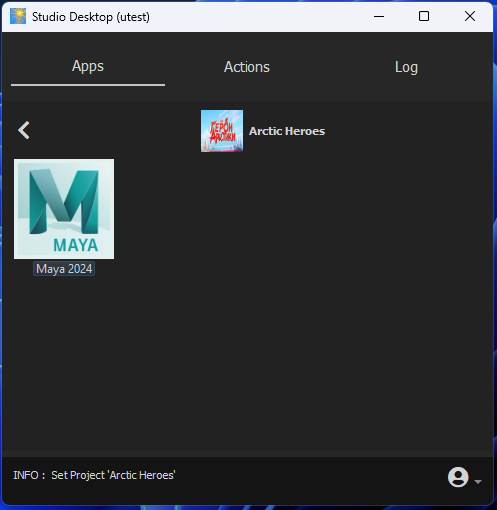
- You can now launch Maya and begin your work.
Always launch Maya through Studio Desktop to ensure the correct environment is set up for loading resources.

Setting Up Quick Launch for Maya
You can set Maya to launch with the necessary plugins directly from a convenient location, without opening Studio Desktop every time:
- Right-click the application icon and select
Create Desktop Shortcut, creating a file on your desktop to launch Maya with the appropriate plugins for the selected project.
- Alternatively, drag the application icon to your desktop while holding down the
Shiftkey.

Scene Setup
Now it's time to start working on the animation scene. Opening a scene works a bit differently compared to other projects, as we use Pixar's USD format to store the scene layout prepared for animators, so you won't be able to open it in the usual way.
This procedure is only necessary the first time you open a scene. After assembly and saving, you can open the scene normally.
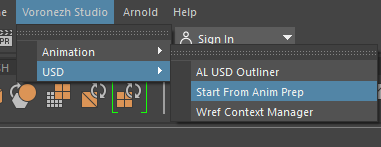
- Always begin by opening a
new, empty scene, then chooseVoronezh Studio => USD => Start From Anim Prep.
- A dialog box will appear where you need to select the episode number and the
scene number you wish to work on. If instead of episode, sequence, and shot
numbers, you see paths to your local drives (or the required scene is missing),
it means the resources for the scene were not downloaded. Make sure to click
Data Sync Download.

- Next, click
Import. After a successful import, save the scene to your working folder. From then on, you can open and save the scene as usual. It's essential to name the scene correctly to avoid issues during review or submission. Save in the .ma format! The naming template should beepXXX_sqXX_shXXX.ma.
The Import operation will create:
- An
AL_USDmaya ProxyShapeobject linked to the latest USD scene viawref. - The frame count matching the USD scene.
- A reference to the latest version of the sound file via
wref. - Automatic pinning of all Maya rigs in the scene to the
Wref Context. This means switching setup versions must be done explicitly through theWref Context Managerif needed. - All other files loaded into the scene are not pinned automatically, so the latest version is always loaded.
Do not manually edit file paths, as it can break the pipeline. If there’s an issue with the scene, please contact support.
Working with a USD Scene
The entire scene loads into Maya as a USD Proxy, with only a minimal number of real objects created.
Characters do not have rigs loaded immediately after the scene is built; however, they should display in a T-pose.
To view the scene hierarchy, load the USD Outliner by selecting Voronezh Studio => USD => AL USD Outliner.
The panel can be docked into Maya’s UI.
 First, decide which characters or objects you need to rig. Some assets may remain
static, or the supervising animator may instruct you to animate specific assets
only.
To switch an asset from cache to rig, select it in the
First, decide which characters or objects you need to rig. Some assets may remain
static, or the supervising animator may instruct you to animate specific assets
only.
To switch an asset from cache to rig, select it in the USD Outliner and right-click, then choose Variants => animDisplayVariant => rig. This will load the Maya reference for the asset. Note that characters won’t retain animation from the layout, so you'll need to position them in the scene based on their layout position.
Since the USD plugin manages reference creation and toggling, never use the Reference Editor or modify references manually, as it may cause crashes.
Activation and Deactivation
When animating, only a few objects are typically manipulated, and most of the scene may be inactive at a given stage.
Handling all objects in the scene can affect performance. In USD, the Active attribute of prims allows control over this. By default, all prims are active, but inactive components are excluded from processing and do not impact performance.
The USD Outliner provides the Activate and Deactivate commands for working with the Active attribute. Deactivate makes a prim and its descendants inactive, excluding them from the scene. In the hierarchical list, inactive prims are crossed out. Activate reverses this, making the prim and its descendants active again.